Cisco Sdm V2.5 And Java Download Mediafire
Contents
Introduction
This document describes how to employ the Cisco Security Device Managing director (SDM) in order to set the basic configuration of the router. This includes the configuration of the IP address, default routing, static and dynamic routing , static and dynamic NATing, hostname, banner, undercover password, user accounts, and so forth. Cisco SDM allows you to configure your router in all kinds of network environments that includes small office home function (SOHO), branch office (BO), regional role, and primal site or Enterprise headquarters using an like shooting fish in a barrel-to-use web-based management interface.
Prerequisites
Requirements
This document assumes that the Cisco router is fully operational and configured to allow the Cisco SDM to make configuration changes.
Note:Refer to Allowing HTTPS Access for SDM in lodge to let the router to exist configured by the SDM.
Components Used
The information in this document is based on these software and hardware versions:
-
Cisco 3640 Router with Cisco IOS? Software Release 12.4(viii)
-
Cisco Security Device Managing director (SDM) Version 2.3.one
The data in this document was created from the devices in a specific lab environment. All of the devices used in this certificate started with a cleared (default) configuration. If your network is live, make sure that you lot empathize the potential impact of whatsoever command.
Note:If you use a Cisco Integrated Service Router (ISR), refer to Basic Router Configuration Using Cisco Configuration Professional for like configuration details with more than powerful features. For data on which routers are suppoted by Cisco CP, refer to the Supported Routers department of the Release Notes for Cisco Configuration Professional ii.v.
Conventions
Refer to the Cisco Technical Tips Conventions for more than data on certificate conventions.
Configure
In this section, you are presented with the information to configure the bones settings for router in a network.
Network Diagram
This certificate uses this network setup:
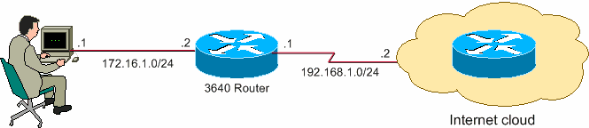
Note:The IP addressing schemes used in this configuration are not legally routable on the Internet. They are RFC 1918 ![]() addresses which have been used in a lab environment.
addresses which have been used in a lab environment.
Interface Configuration
Complete these steps in social club to configure the interfaces of a Cisco router.
-
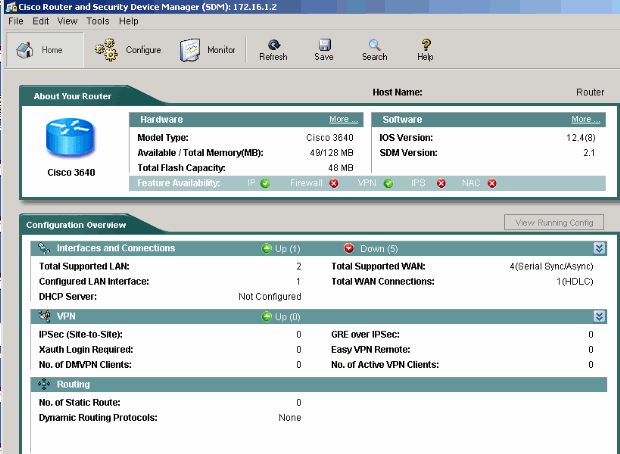
Click Home in order to go to the SDM Domicile page.
The SDM Home folio provides information such as hardware and software of the router, feature availability, and a configuration summary. The dark-green circles evidence the features supported in this router and the red circles evidence the features not supported.
-
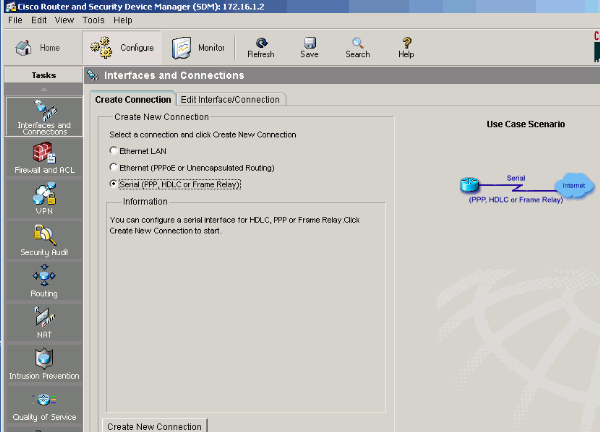
Choose Configure > Interfaces and Connections > Create Connection in order to configure the WAN connection for the interface.
As an case, for serial interface 2/0, cull the Serial option and click Create New Connection.
Note:For other types of interfaces similar Ethernet, choose the corresponding interface type and proceed by clicking the Create New Connection button.
-
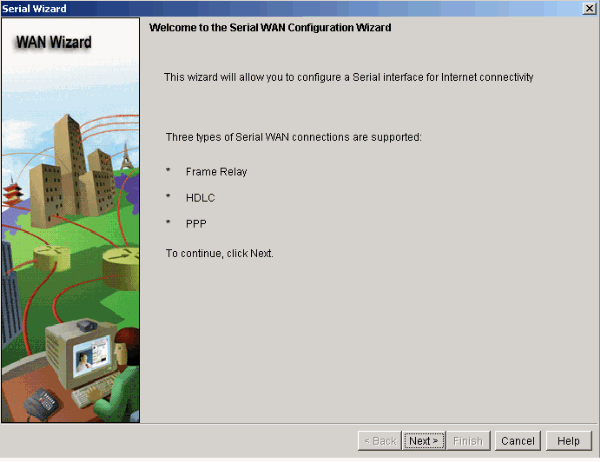
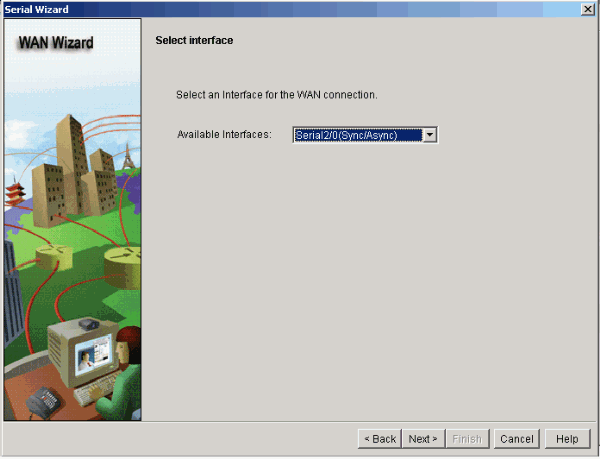
Click Next in order to proceed once this interface appears.
-
Select Serial interface 2/0 (desired) from the Available Interfaces option and click Adjacent.
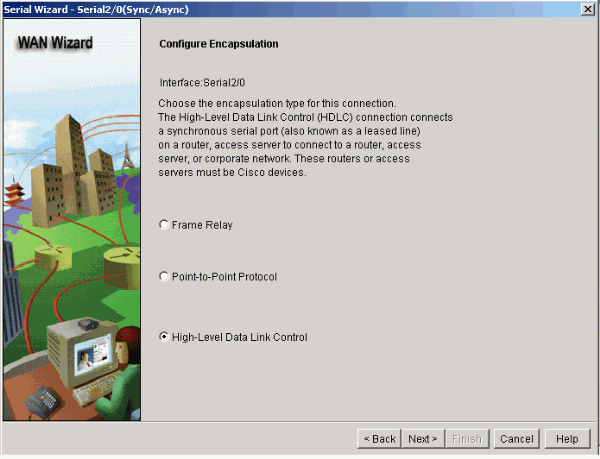
-
Cull the encapsulation type for the series interface and click Next.
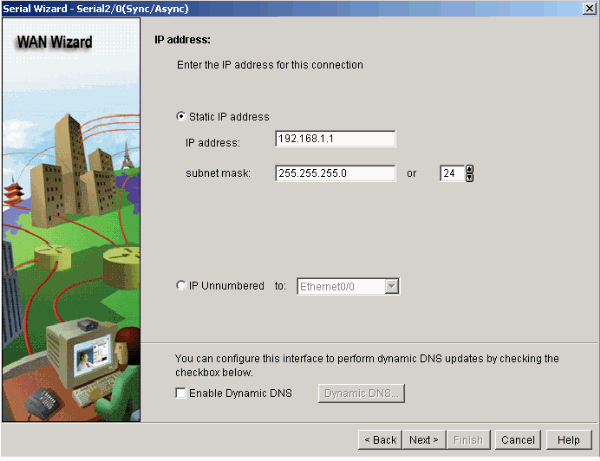
-
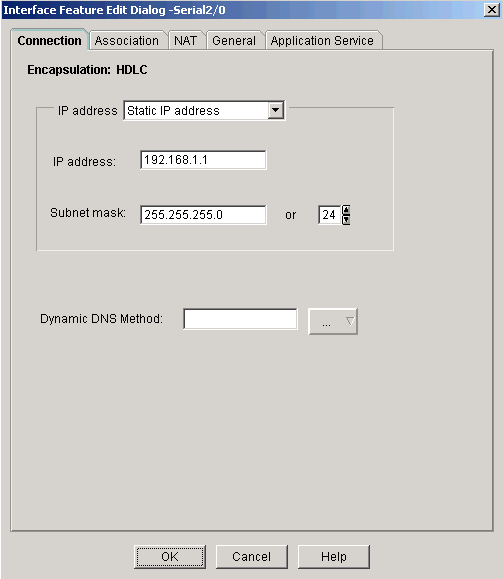
Specify the static IP address with the respective subnet mask for the interface and click Side by side.
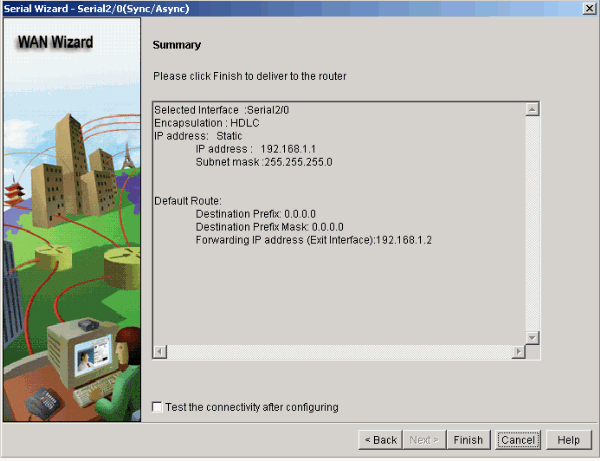
-
Configure the default routing with optional parameters such every bit the next hop IP address (192.168.ane.2 as per network diagram) supplied by the Internet access provider and click Next.

This window appears and shows the configuration summary configured by the user. Click End.
This window appears and shows the command delivery status to the router. Otherwise, it displays errors if the command delivery fails due to incompatible commands or unsupported features.

-
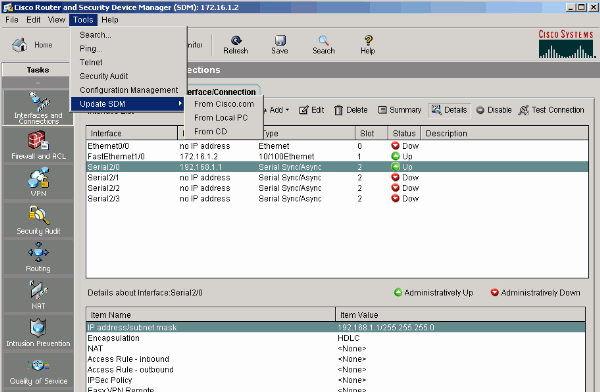
Choose Configure > Interfaces and Connections > Edit Interfaces/Connections in order to add together/edit/delete the various interfaces.
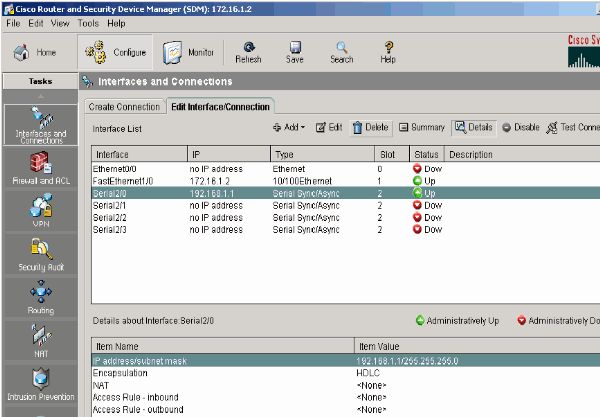
Highlight the interface with which you want to brand changes and click Edit if you want to edit or change the interface configuration. Hither y'all can modify the existing static IP address.
NAT Configuration
Dynamic NAT Configuration
Consummate these steps in gild to configure the dynamic NAT in a Cisco router.
-
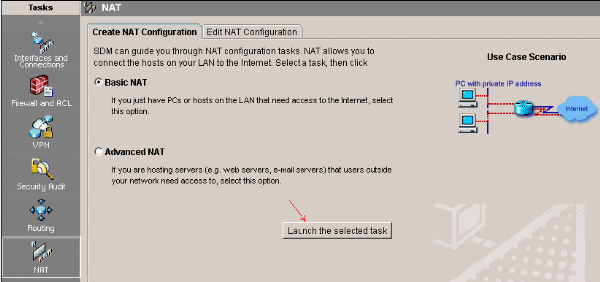
Cull Configure > NAT > Basic NAT and click Launch the selected task in order to configure basic NATing.
-
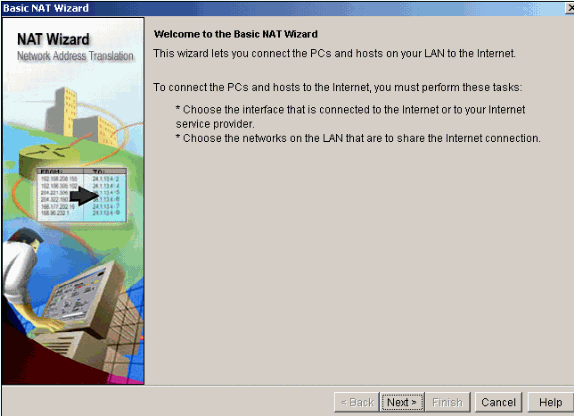
Click Next.
-
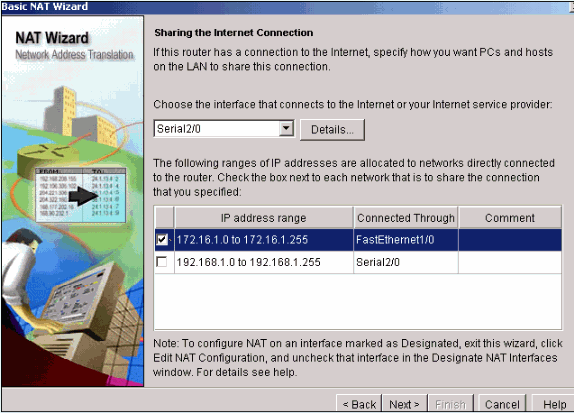
Cull the interface that connects to the Internet or your Internet access provider and choose the IP address range to which Internet access is to be shared.
-
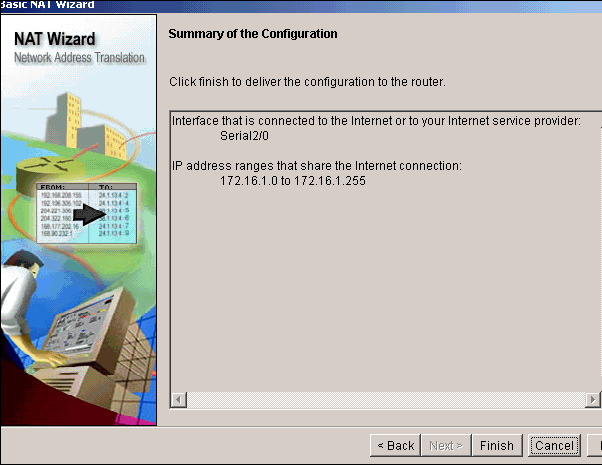
This window appears and shows the configuration summary configured by the user. Click Finish.
-
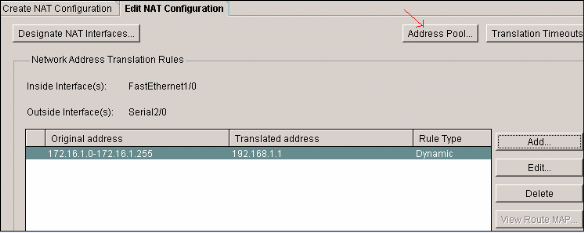
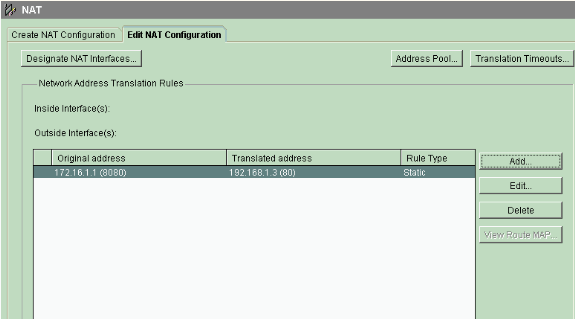
The Edit NAT Configuration window shows the configured dynamic NAT configuration with the translated IP accost overloaded (PATing). If you want to configure the dynamic NATing with address pool, click Address Puddle.
-
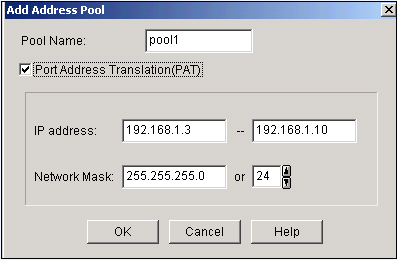
Click Add.
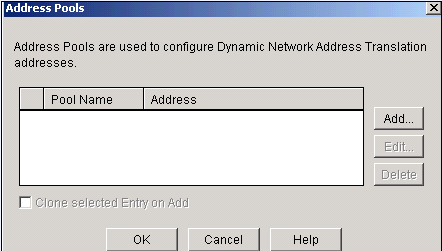
Hither informations such as the pool name and IP address range with netmask are provided. In that location can exist times when most of the addresses in the pool have been assigned, and the IP accost puddle is nearly depleted. When this occurs, PAT can exist used with a single IP address in order to satisfy boosted requests for IP addresses. Check Port Address Translation (PAT) if yous want the router to utilize PAT when the accost puddle is close to depletion.
-
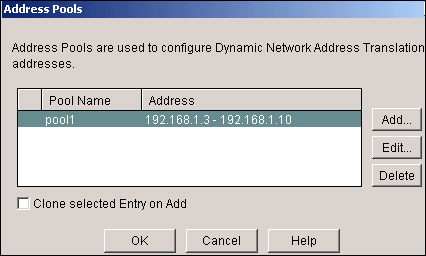
Click Add.
-
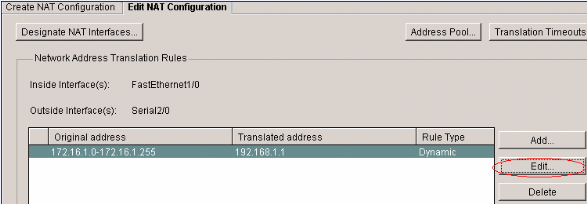
Click Edit.
-
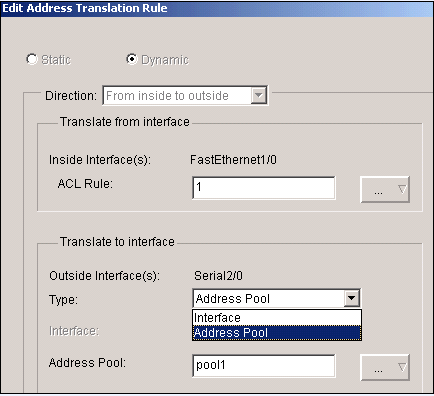
Choose Address Pool in the Blazon field, provide the name to the Address Pool as pool1 and click OK.
-
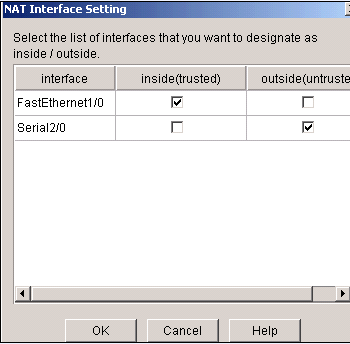
This window shows the configuration for dynamic NATing with the address pool. Click Designate NAT Interfaces.
Employ this window in club to designate the inside and outside interfaces that you lot want to apply in NAT translations. NAT uses the inside and outside designations when it interprets translation rules, because translations are performed from inside to outside, or from outside to inside.
One time designated, these interfaces are used in all NAT translation rules. The designated interfaces appear above the Translation Rules list in the main NAT window.
Static NAT Configuration
Complete these steps in order to configure static NAT in a Cisco router.
-
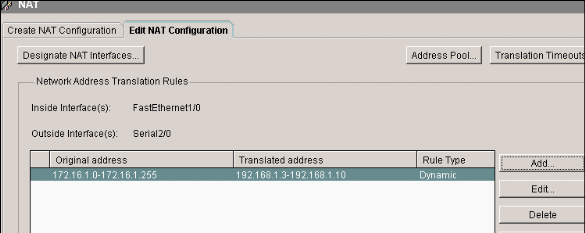
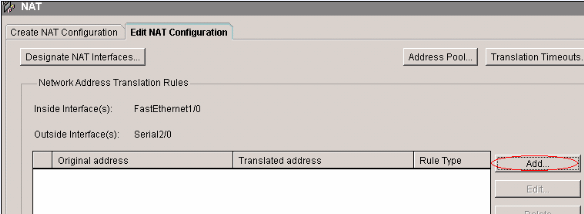
Choose Configure > NAT > Edit NAT Configuration and click Add together in order to configure static NATing.
-
Choose the Direction either from within to outside or from outside to within, specify the within IP address to be translated under Translate from Interface. For the Translate to Interface area select the Type.
-
Choose IP Address if you want the Translate from Accost to be translated to an IP accost divers in the IP Address field.
-
Cull Interface if you want the Translate from Address to use the address of an interface on the router. The Translate from Address is translated to the IP address assigned to the interface that you specify in the Interface field.
Check Redirect Port if you want to include port information for the inside device in the translation. This enables yous to use the same public IP accost for multiple devices, as long every bit the port specified for each device is different. You must create an entry for each port mapping for this Translated to address. Click TCP if this is a TCP port number and click UDP if information technology is a UDP port number. In the Original Port field, enter the port number on the within device. In the Translated Port field, enter the port number that the router is to apply for this translation. Refer to the Assuasive the Internet to Access Internal Devices section of Configuring Network Accost Translation: Getting Started.
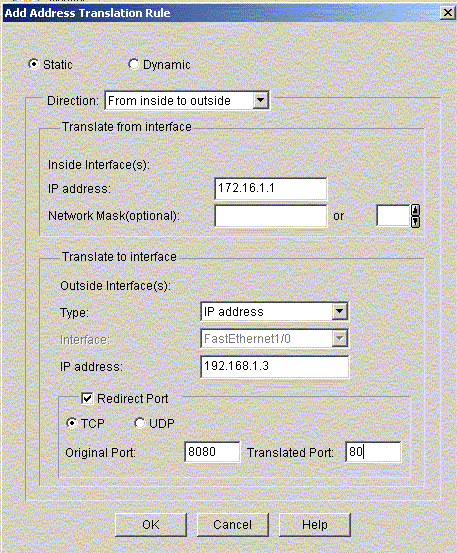
This window shows the static NATing configuration with port redirection enabled.
-
Routing Configuration
Static Routing Configuration
Consummate these steps in order to configure static routing in a Cisco router.
-
Choose Configure > Routing > Static Routing and click Add in gild to configure static routing.

-
Enter the Destination Network address with mask and select either outgoing interface or side by side hop IP accost.
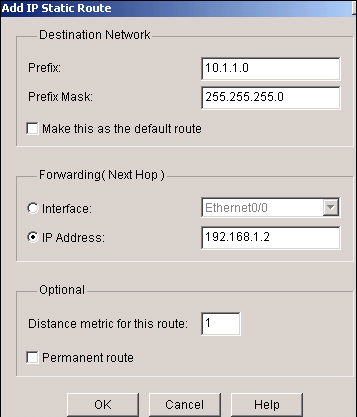
This window shows the static route configured for the x.one.ane.0 network with 192.168.ane.2 as the side by side hop IP accost.

Dynamic Routing Configuration
Complete these steps in order to configure the dynamic routing in a Cisco router.
-
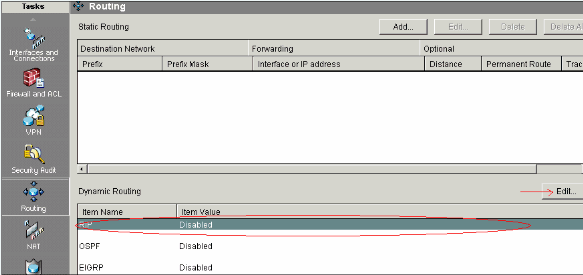
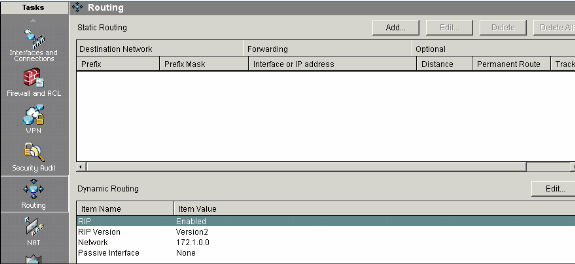
Choose Configure > Routing > Dynamic Routing.
-
Select the RIP and click Edit.
-
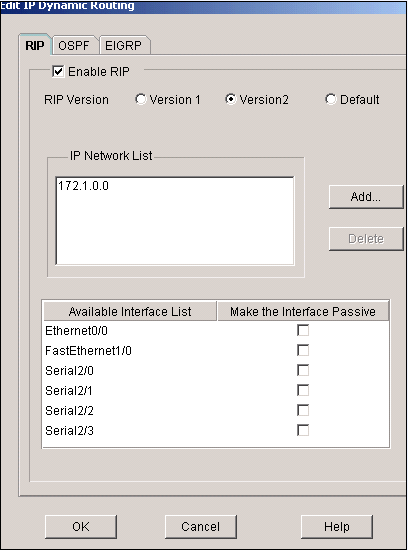
Bank check Enable RIP, select the RIP version, and click Add together.
-
Specify the Network address to be advertised.
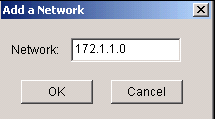
-
Click OK.
-
Click Deliver in order to transfer the commands to the router.
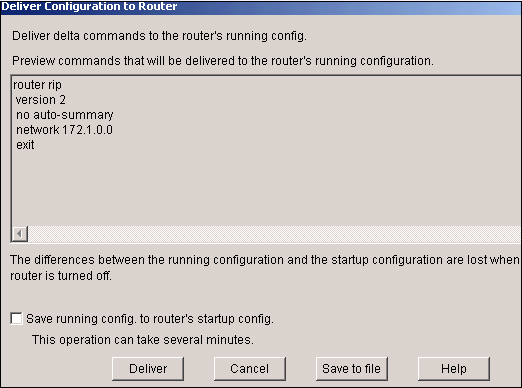
This window shows the dynamic RIP routing configuration.
Miscellaneous Configuration
Complete these steps in gild to configure the other bones settings in a Cisco router.
-
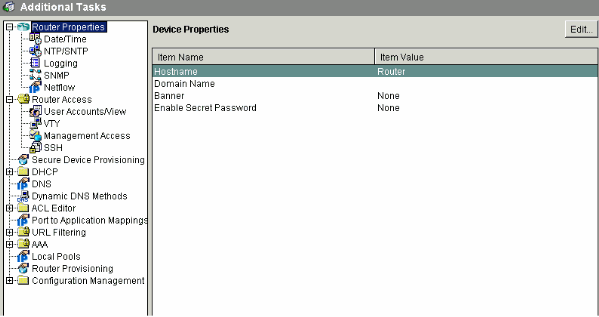
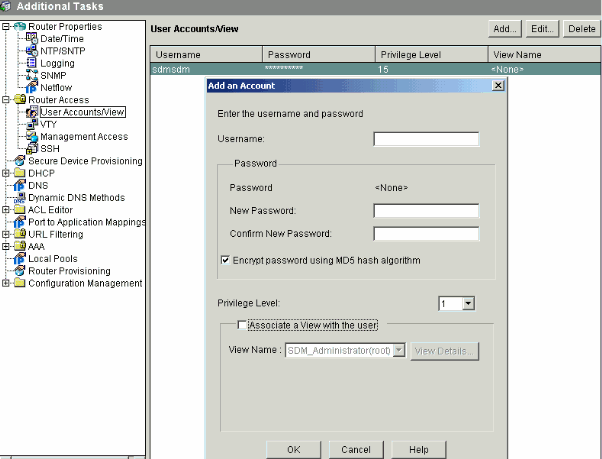
Cull Configure > Additional Tasks > Router Properties and click Edit if you desire to change the Hostname, Domain Name, Imprint and Enable Surreptitious Countersign properties for a router.
-
Choose Configure > Additional Tasks > Router Admission > User Accounts/View in order to add/edit/delete the User Accounts to the router.
-
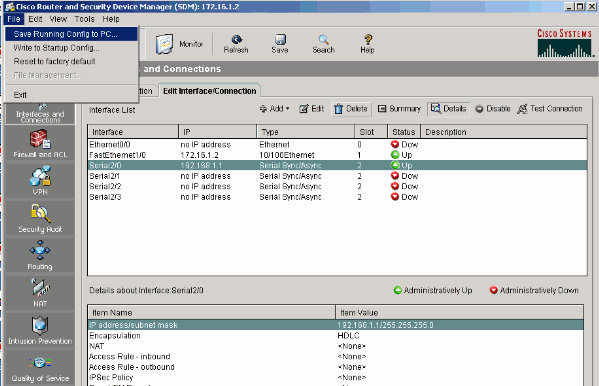
Choose File > Salve Running Config to PC... in social club to relieve the configuration to the NVRAM of the router as well as the PC and to reset the current configuration to default (factory) settings.
-
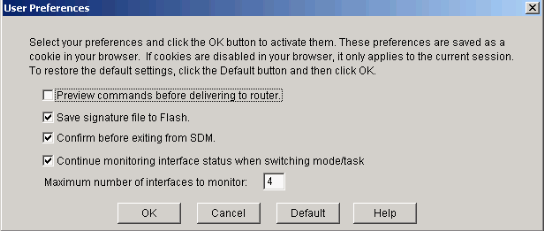
Go to the chore bar and cull Edit > Preferences in guild to enable these User Preferences options:
-
Preview commands earlier delivering to router.
-
Save signature file to Flash.
-
Confirm before exiting from SDM.
-
Continue monitoring interface status when switching mode/chore.
-
-
Choose View from the task bar if you want to:
-
View the Home, Configure, or Monitor pages.
-
View the running configuration of the router.
-
View various show commands.
-
View SDM default rules.
-
Choose Refresh in order to synchronize the router configuration if at that place are whatsoever configured through the CLI with SDM.

-
CLI Configuration
| Router Configuration |
|---|
Router#testify run Building configuration... Current configuration : 2525 bytes ! version 12.4 service timestamps debug datetime msec service timestamps log datetime msec no service password-encryption ! hostname Router ! boot-start-marking boot-stop-marker ! no logging buffered enable password cisco ! no aaa new-model ! resource policy ! ! ! ip cef ! ! ! !--- RSA certificate generated afterwards yous enable the !--- ip http secure-server control. crypto pki trustpoint TP-cocky-signed-392370502 enrollment selfsigned subject-name cn=IOS-Self-Signed-Certificate-392370502 revocation-check none rsakeypair TP-self-signed-392370502 ! ! crypto pki certificate chain TP-self-signed-392370502 certificate self-signed 01 3082023C 308201A5 A0030201 02020101 300D0609 2A864886 F70D0101 04050 30312E30 2C060355 04031325 494F532D 53656C66 2D536967 6E65642D 43657 69666963 6174652D 33393233 37303530 32301E17 0D303530 39323330 34333 375A170D 32303031 30313030 30303030 5A303031 2E302C06 03550403 13254 532D5365 6C662D53 69676E65 642D4365 72746966 69636174 652D3339 32333 35303230 819F300D 06092A86 4886F70D 01010105 0003818D 00308189 02818 C86C0F42 84656325 70922027 EF314C2F 17C8BBE1 B478AFA3 FE2BC2F2 3C272 A3B5E13A 1392A158 73D8FE0D 20BFD952 6B22890C 38776830 241BE259 EE2AA CF4124EA 37E41B46 A2076586 2F0F9A74 FDB72B3B 6159EEF7 0DEC7D44 BE489 9E351BF7 F5C808D9 2706C8B7 F5CE4B73 39ED8A61 508F455A 68245A6B D072F 02030100 01A36630 64300F06 03551D13 0101FF04 05300301 01FF3011 06035 11040A30 08820652 6F757465 72301F06 03551D23 04183016 80148943 F2369 ACD8CCA6 CA04EC47 C68B8179 E205301D 0603551D 0E041604 148943F2 36910 D8CCA6CA 04EC47C6 8B8179E2 05300D06 092A8648 86F70D01 01040500 03818 3B93B9DC 7DA78DF5 6D1D0D68 6CE075F3 FFDAD0FB 9C58E269 FE360329 2CEE3 D8661EB4 041DEFEF E14AA79D F33661FC 2E667519 E185D586 13FBD678 F52E1 E3C92ACD 52741FA4 4429D0B7 EB3DF979 0EB9D563 51C950E0 11504B41 4AE79 0DD0BE16 856B688C B727B3DB 30A9A91E 10236FA7 63BAEACB 5F7E8602 0C33D quit ! ! ! ! ! ! ! ! ! ! !--- Create a user account named sdmsdm with all privileges. username sdmsdm privilege 15 countersign 0 sdmsdm ! ! ! ! ! ! interface Ethernet0/0 no ip address shutdown half-duplex ! !--- The LAN interface configured with a private IP address. interface FastEthernet1/0 ip address 172.16.1.two 255.255.255.0 !--- Designate that traffic that originates from behind !--- the interface is subject to Network Accost Translation (NAT). ip nat inside ip virtual-reassembly duplex auto speed automobile ! !--- This is the WAN interface configured with a routable (public) IP address. interface Serial2/0 ip address 192.168.ane.1 255.255.255.0 !--- Designate that this interface is the !--- destination for traffic that has undergone NAT. ip nat outside ip virtual-reassembly ! interface Serial2/ane no ip address shutdown ! interface Serial2/2 no ip address shutdown ! interface Serial2/three no ip accost shutdown ! !--- RIP version ii routing is enabled. router rip version two network 172.1.0.0 no auto-summary !--- This is where the commands to enable HTTP and HTTPS are configured. ip http server ip http secure-server ! !--- This configuration is for dynamic NAT. ! !--- Define a puddle of outside IP addresses for NAT. ip nat pool pool1 192.168.one.three 192.168.1.10 netmask 255.255.255.0 !--- In order to enable NAT of the inside source address, !--- specify that traffic from hosts that match access listing one !--- are NATed to the address puddle named pool1. ip nat inside source listing 1 puddle pool1 ! !--- Access list i permits merely 172.16.one.0 network to exist NATed. access-listing 1 remark SDM_ACL Category=2 access-list 1 permit 172.16.1.0 0.0.0.255 ! !--- This configuration is for static NAT !--- In society to interpret the packets between the existent IP address 172.16.one.1 with TCP !--- port 80 and the mapped IP address 192.168.1.1 with TCP port 500. ip nat within source static tcp 172.16.one.one fourscore 192.168.1.3 500 extendable ! ! ! ! !--- The default route is configured and points to 192.168.1.ii. ip route 0.0.0.0 0.0.0.0 192.168.1.two ! ! !--- The static road is configured and points to 192.168.1.2. ip road ten.i.one.0 255.255.255.0 192.168.1.2 ! ! control-plane ! ! ! ! ! ! ! ! ! ! line con 0 line aux 0 !--- Telnet enabled with password equally sdmsdm. line vty 0 4 password sdmsdm login ! ! finish |
Verify
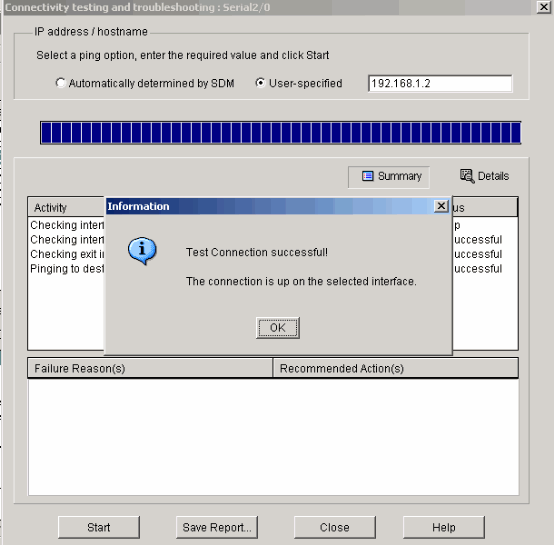
Cull Configure > Interface & Connections > Edit Interface Connections > Exam Connection in order to test the stop-to-end connectivity. You tin specify the remote end IP address if you click the User-specified radio push.
Troubleshoot
The Output Interpreter Tool (registered customers only) (OIT) supports certain prove commands. Use the OIT to view an analysis of prove control output.
Note:Refer to Important Information on Debug Commands before you lot issue debug commands.
You can use these options in order to troubleshoot:
-
Choose Tools > Update SDM from the task bar in gild to ping, Telnet, and upgrade the SDM to the latest version. Y'all can exercise this from Cisco.com, from the local PC, or from the CD.
-
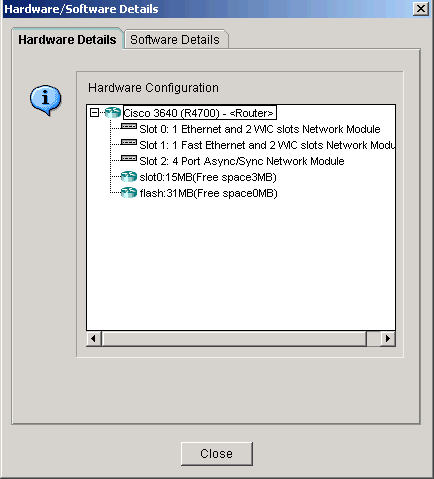
Choose Aid > About this Router in gild to view information on the hardware configuration of the router.
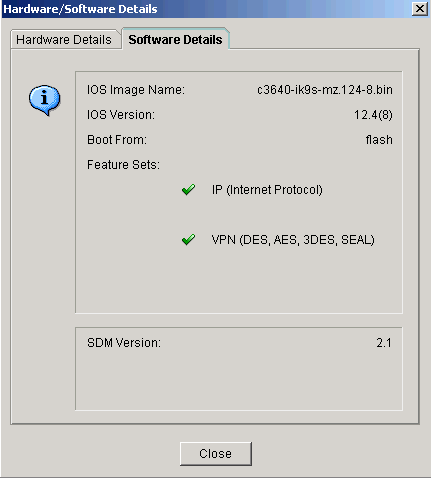
This window shows information about the IOS image stored in the router.
-
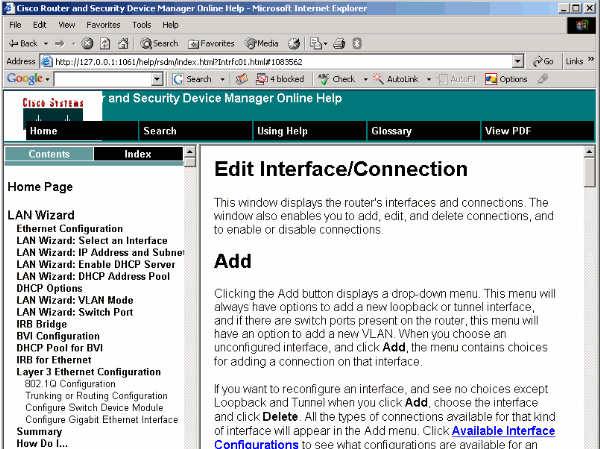
The Help option provides information well-nigh the various available options in the SDM for the configuration of routers.
Comatibility of SDM with 64-bit Os
SDM is not supported on machines with 64-fleck OS. You should install SDM on the router and access it through the web browser.
Refer to Task 4: Install the SDM Files for more information on the installation of SDM files on the router.
Unable to Launch the SDM through Web Browser
Problem
When yous use SDM through the web browser, an SDM start up error message appears.
Solution 1
The effect could be with the version of the Java. The Java update may not be uniform with the SDM version. If the version of Coffee is Coffee 6 update 12, so uninstall that version and install Java 6 update 3. This fixes the problem. Refer to the Spider web Browser Versions and Java Runtime Environment Versions section of SDM ii.five Release Note for more than data about the compatibility. SDM version ii.5 runs under updates ii and three of Java version six.
Solution 2
Enable Allow active content to run in files on My Computer in Internet Explorer options in society to resolve the issue.
-
Open Net Explorer and cullTools > Cyberspace Options > Advanced.
-
Nether the security department, make certain that the checkboxes next to the options Allow active content to run in files on my computer and Let active content to install software even if the signature is invalid are checked.
-
Now click OK and restart the browser in order for the changes to take effect.
Mistake: java.bling stack overflow
Problem
I am unable to connect to the SDM, and I receive this error message:
java.bling stack over flow
Solution
This trouble usually occurs when Java code version 1.5.0_06 is used. For information on how to resolve this issue, refer to The user is unable to connect to Security Device Managing director (SDM) and receives the java.bling stack over period error bulletin.
Related Information
- Cisco Security Device Director Installation Guide
- Cisco Product Support Folio - Routers
- Cisco Configuration Professional Support Page
- NAT Back up Page
- Technical Support & Documentation - Cisco Systems
DOWNLOAD HERE
Posted by: andersontardwilis.blogspot.com